


1. Have you run into this?
You’ve installed low-voltage LED strips in a pergola, cabinet, or garden path. When you power them on, the first section looks great—but the further you go, the dimmer it gets. The tail end is visibly darker.
That’s not a faulty strip. That’s voltage drop.
2. Voltage Drop Explained: Resistance vs. Current Flow

Think of voltage as water pressure pushing current forward. The copper conductors on the strip are like a pipe—the longer the pipe, the more friction (resistance).
As current flows, part of the voltage is lost as heat in the conductors. The result: lower voltage at the far end, so LEDs there receive less voltage and appear dimmer (color shift can also occur).
■ Key Principles
Double length = Double resistance = 300% VD increase
12V systems suffer 4x more VD sensitivity than 24V (P=U²/R)
As a strip manufacturer, we’re asked every day:
- How long can I run a 12 V/24 V strip?
- Why does the tail get dimmer?
- How do I size the power supply correctly?
- Parallel, series, or two-end feed—what’s best?
This article explains it all and shows you how to install correctly to avoid uneven brightness.
3. Industry Gold Standard: Maximum Run Lengths
Voltage Max. Single Run Engineering Basis:
12V ≤5 meters | >2V drop = 30% brightness loss |
24V ≤10 meters | 400% higher VD tolerance |
Note: “12W/24W” are incorrect; “12V/24V”—correct unit is Volts (V)!
4. Wiring methods—pros, cons, and when to use them
A) Single-end feed “daisy-chain” (least recommended)
What it is: Power connects to the head of the first strip, then you link strip tail-to-head like skewered fruits.
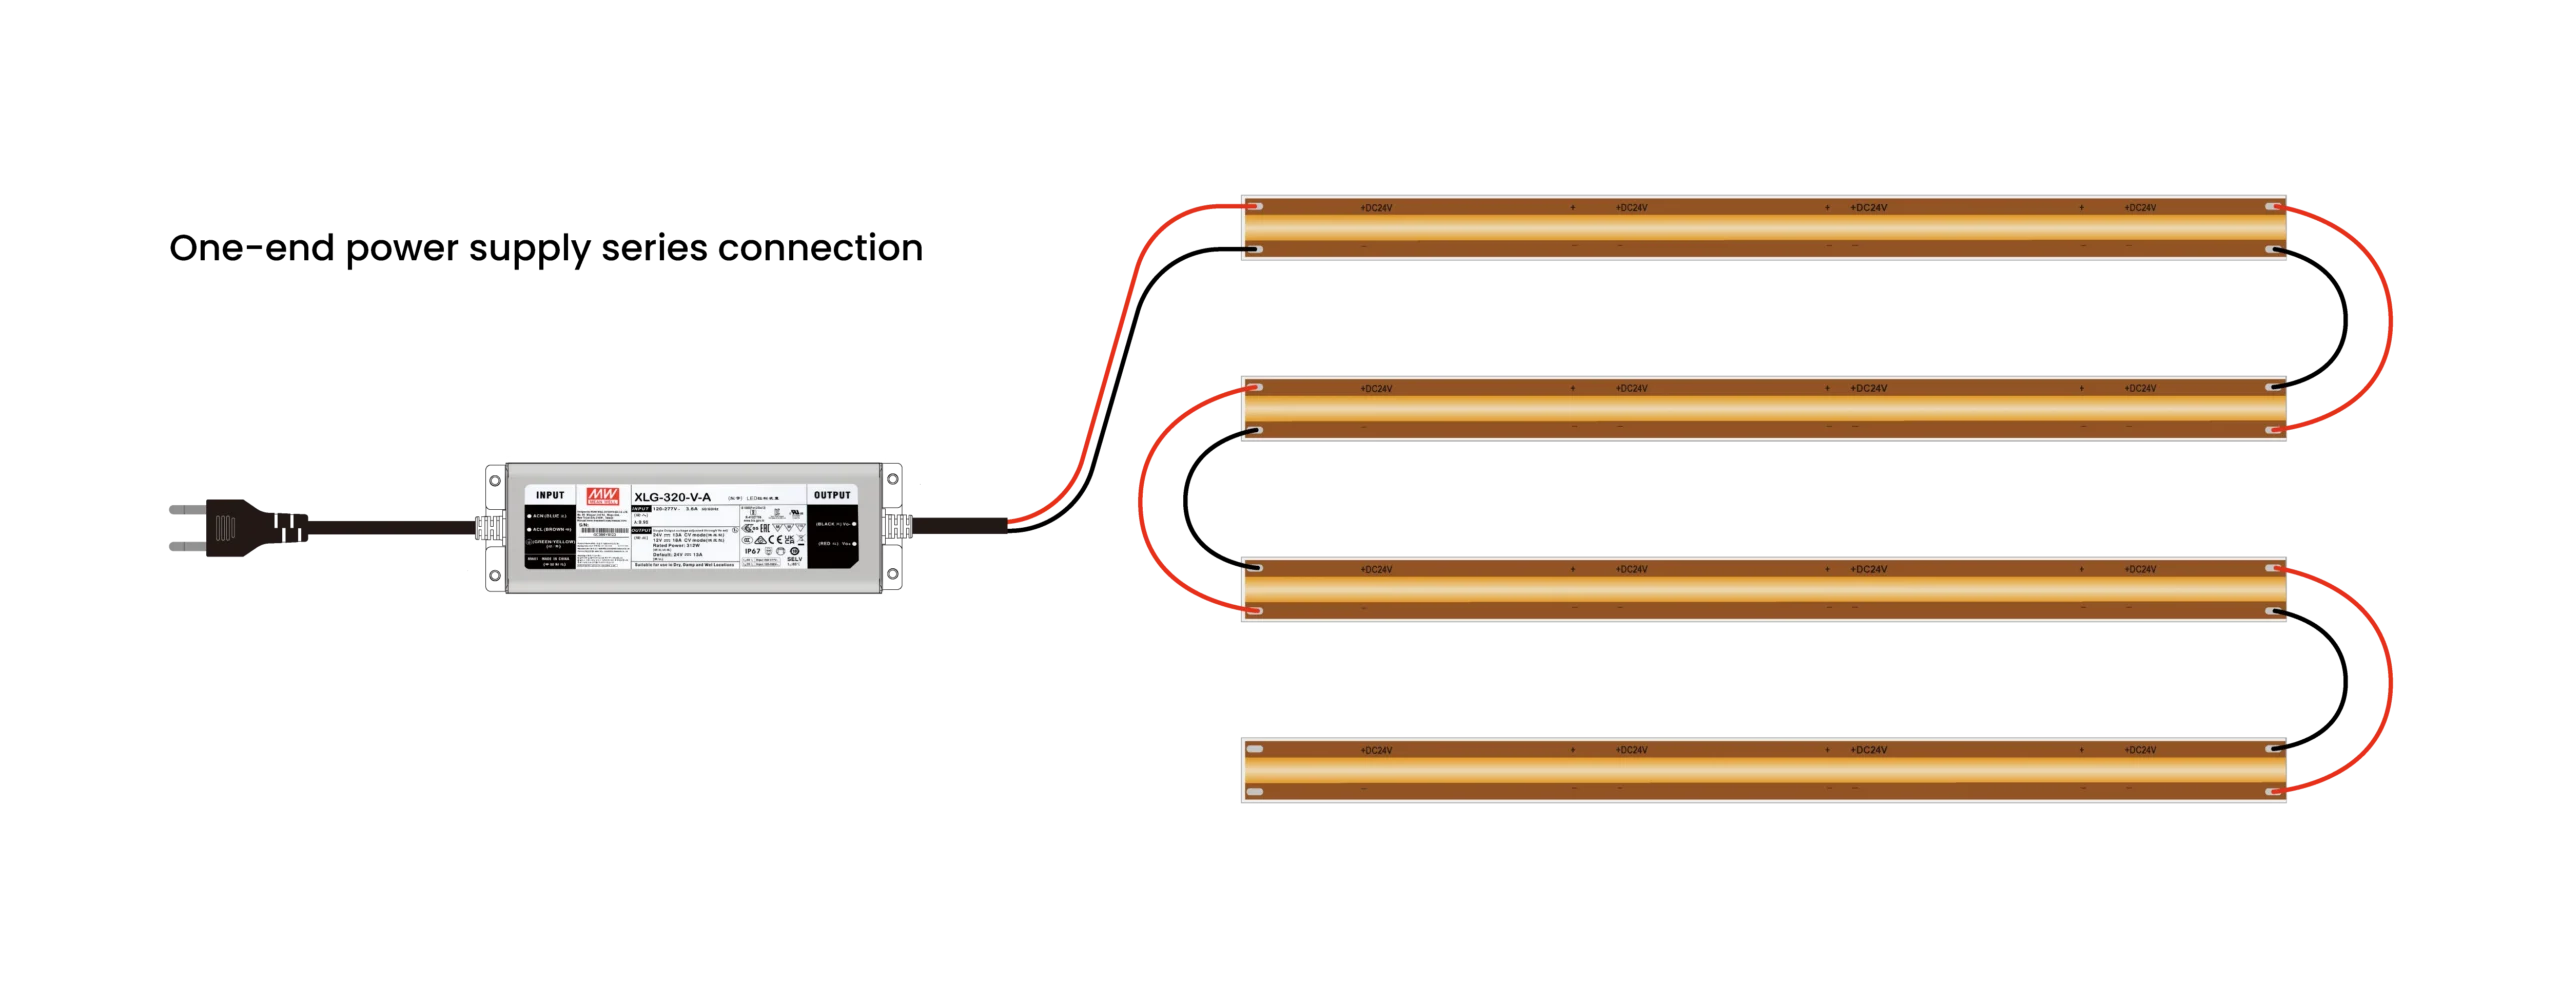
Why it’s poor:
- Voltage drop accumulates along the chain; the last section is the dimmest.
- Problems become obvious when you exceed the 5 m (12 V) / 10 m (24 V) guideline.
Use only when:
Total length is ≤ 5 m (12 V) or ≤ 10 m (24 V) and end-of-run brightness isn’t critical.
B) Parallel feed (most recommended)
What it is: Each strip (or segment) connects directly to the power supply outputs (often via a splitter or branch wiring). Every strip “sees” nearly the same voltage.
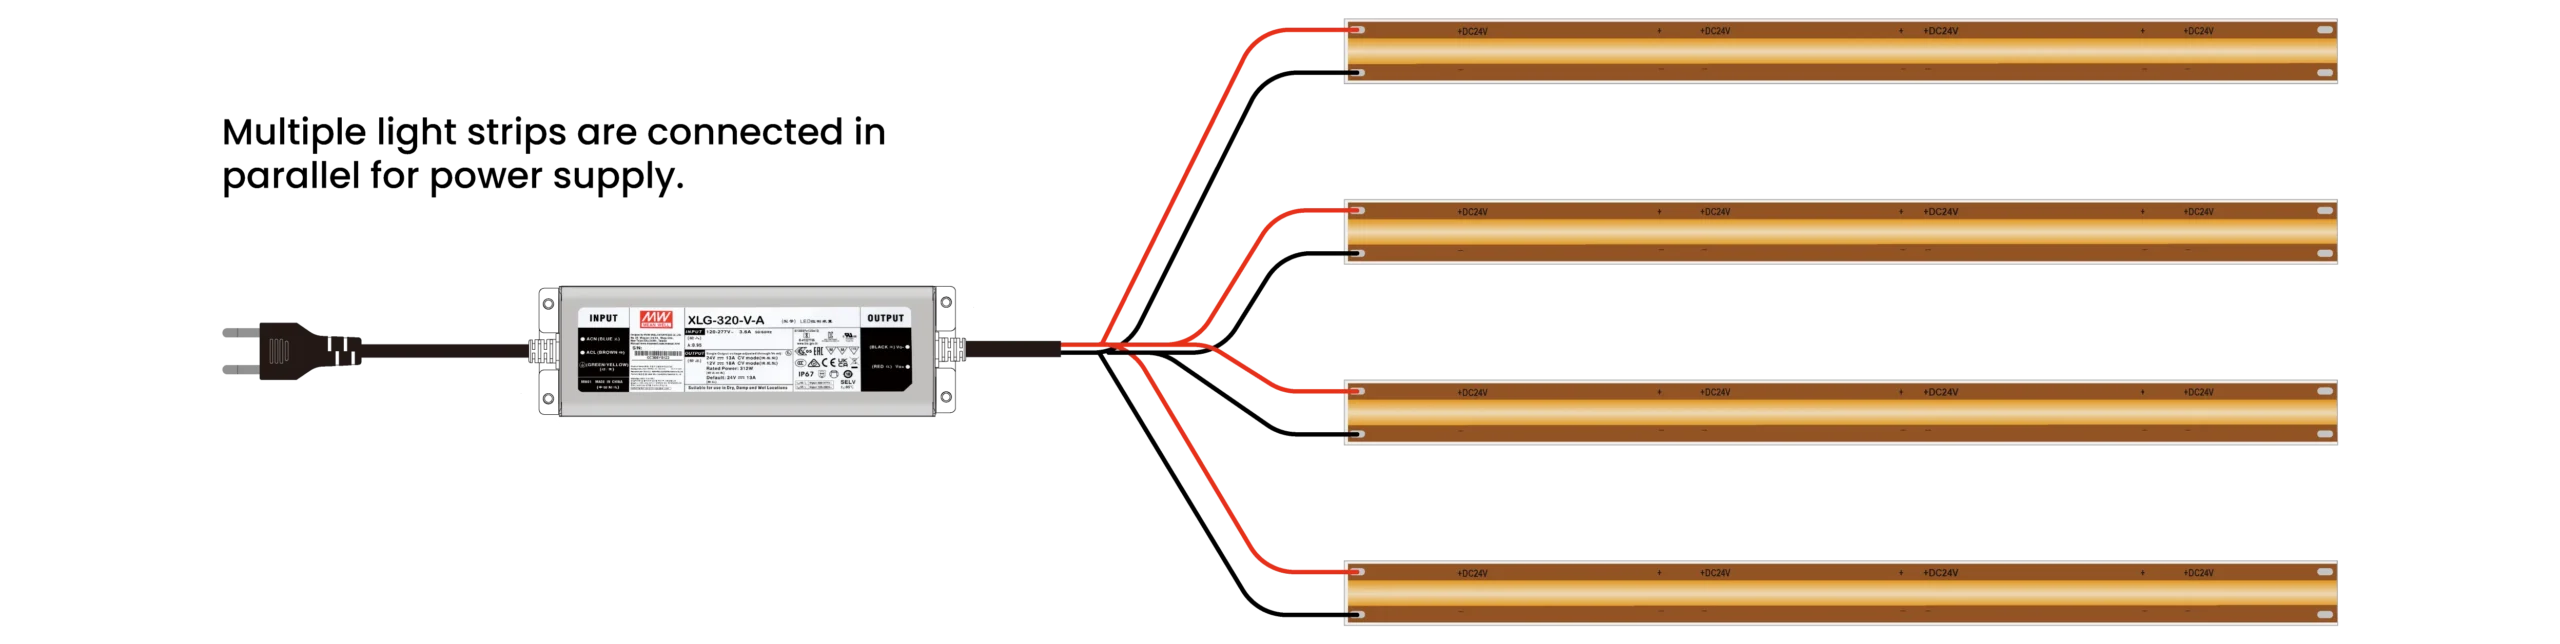

Why it’s great:
- Minimal voltage drop per segment; Uniform brightness (>90% consistency) best uniformity.
- Single strip failure isolation,A failure on one segment doesn’t take down the others.
Key notes:
- Each parallel segment still obeysthe single-run rule (5 m/10 m).
- Your power supply must cover the total load(see Section 5).
Use when:
- Multiple shorter segments spread around (different walls, cabinet levels, zones).
C) Two-end feed (best for a single long run)
What it is: Connect the power supply to both the head and the tail of the same strip (same big power supply or 2 different power supply, same +/– at both ends). Current flows from both ends toward the middle.

Why it helps:
- Cuts the current traveling across the strip length, reducing voltage drop dramatically.
- Extends the length that remains evenly lit (e.g., 12 V can often reach ~8–10 m, 24 V can often reach ~15–20 m, depending on strip specs).
Safety note:
- Properly done with the same big power supply(or 2 differnnt small power supply), two-end feed does not short-circuit. The internal parallel structure of strips allows current to balance from both ends.
Check the links:https://www.youtube.com/watch?v=MNxRiYyKCKg
Use when:
- You need one continuous strip close to or slightly beyond the guideline (long bar counter, corridor coves, long linear slots) and can’t split into separate parallel segments.
Execution tips:
- Use adequately thick, short supply leads (e.g., 18 AWG or thicker for longer feeds).
- Ensure both ends are connected to the same + – outputs.
5. Power supply sizing—simple and reliable
PSU =(L total×P W/m )×1.2
Use a 1.2 safety factor (≈20% headroom).
Example
10 m strip at 10 W/m → load = 100 W → choose ≥ 120 W PSU.
Why headroom matters
- Real-world efficiency and wiring losses,
- Lower heat and longer PSU lifespan,
- Room for transient peaks and dimming control overhead.
PSU tips
- Match voltage: 12 V strip ↔ 12 V PSU, 24 V strip ↔ 24 V PSU,
- Prefer reputable brands with CE/UL certifications,
- Choose constant-voltage (CV) supplies,
- Consider environment (indoor/outdoor, IP rating), size, and cooling.
Many wiring diagrams say “Total strip wattage ≤ transformer wattage.” That’s the bare minimum. For stability and longevity, we strongly recommend the +20% headroom rule above.
Other tips 1:
If you have a sufficient budget(2-3 times expensive than normaly CV strips) and it is for people whom inconvenient to supply power from both ends.
we recommend choosing a constant voltage& constant current light strip.
- CC&CV24V Max running length<30M,
- CC&CV48V Max running length<50M.
Other tips 2:
High voltage(110V&220V) strips, Maximum could run can illuminate up to 100 meters. But unsafe and do not offer many color change modes, so they are not recommended.
6. Scenario-based recommendations
Scenario | Recommended wiring | Why |
≤ 5 m (12 V) or ≤ 10 m (24 V) | Single-end feed or parallel | Most economical; short enough that drop is limited |
> 5 m (12 V) or > 10 m (24 V) | Parallel | Best brightness uniformity; easy to expand |
Single long run near the limit | Two-end feed | Raises tail voltage; improves uniformity |
Very long installations (far beyond 10–20 m) | Segment + distributed PSUs | Local power reduces drop and simplifies maintenance |
7. Common mistakes (and how to avoid them)
Mistake 1: Daisy-chaining long lengths (> 5 m @12 V, > 10 m @24 V) → dim tail.
Fix: Respect run limits or switch to parallel/two-end feed.
Mistake 2: Power supply sized “exactly equal” to load → hot PSU, early failure.
Fix: Add ≥ 20% headroom.
Mistake 3: Tail feed wires too thin/too long → the wires themselves drop voltage.
Fix: Use thicker gauge (e.g., 18 AWG or thicker) and keep leads short.
Mistake 4: Confusing V and W → wrong selection.
Fix: Double-check spec sheets: voltage is V (12 V / 24 V).
Mistake 5: Afraid two-end feed will short → avoid using it.
Fix: With the same/different PSU and correct polarity, it’s safe and effective.
8. Wrap-up
1.) Voltage drop is the main reason for end-of-run dimming on low-voltage strips.
2.) Follow the golden rule: 5 m @12 V, 10 m @24 V per single run.
3.) Prefer parallel wiring for multi-segment jobs; use two-end feed for a single long run; avoid long daisy-chains.
4.) Size the PSU with ≥ 20% headroom: PSU ≥ length × W/m × 1.2.
As a strip manufacturer, we can support your project with:
1) Accurate PSU sizing and wiring design,
2) High-quality low-voltage strips with clearly labeled specs (voltage, W/m, A/m),
3) Compatible power supplies and accessories.
Have a plan or a sketch? Send it over—we’ll review and propose a clean wiring layout with the right PSU.
[Manufacturer’s Value-Add Services]
For readers:
✅ Free Wiring Design (CAD-ready drawings)
✅ PSU Calculator Tool (Excel download)
✅ Dual-Feed Waterproof Connectors (Limited offer)
>> Contact our Global Tech Team for 《Low-Voltage LED Strip Engineering Guide》

Pingback: How to Wire LED Strip Lights: A Comprehensive Guide with Wiring Diagrams - pergolalights.net
Pingback: Guía definitiva sobre la temperatura de color de los LED (2000K-6500K)
Pingback: Cómo dimensionar los controladores LED de 24 V para paquetes de iluminación de vigas de pérgola, persianas y tiras luminosas