
1. Have you run into this?
You’ve installed low-voltage LED strips in a pergola, cabinet, or garden path. When you power them on, the first section looks great—but the further you go, the dimmer it gets. The tail end is visibly darker.
That’s not a faulty strip. That’s voltage drop.
2. Voltage Drop Explained: Resistance vs. Current Flow

Think of voltage as water pressure pushing current forward. The copper conductors on the strip are like a pipe—the longer the pipe, the more friction (resistance).
As current flows, part of the voltage is lost as heat in the conductors. The result: lower voltage at the far end, so LEDs there receive less voltage and appear dimmer (color shift can also occur).
■ Key Principles
Double length = Double resistance = 300% VD increase
12V systems suffer 4x more VD sensitivity than 24V (P=U²/R)
As a strip manufacturer, we’re asked every day:
- How long can I run a 12 V/24 V strip?
- Why does the tail get dimmer?
- How do I size the power supply correctly?
- Parallel, series, or two-end feed—what’s best?
This article explains it all and shows you how to install correctly to avoid uneven brightness.
3. Industry Gold Standard: Maximum Run Lengths
Voltage Max. Single Run Engineering Basis:
12V ≤5 meters | >2V drop = 30% brightness loss |
24V ≤10 meters | 400% higher VD tolerance |
Note: “12W/24W” are incorrect; “12V/24V”—correct unit is Volts (V)!
4. Wiring methods—pros, cons, and when to use them
A) Single-end feed “daisy-chain” (least recommended)
What it is: Power connects to the head of the first strip, then you link strip tail-to-head like skewered fruits.
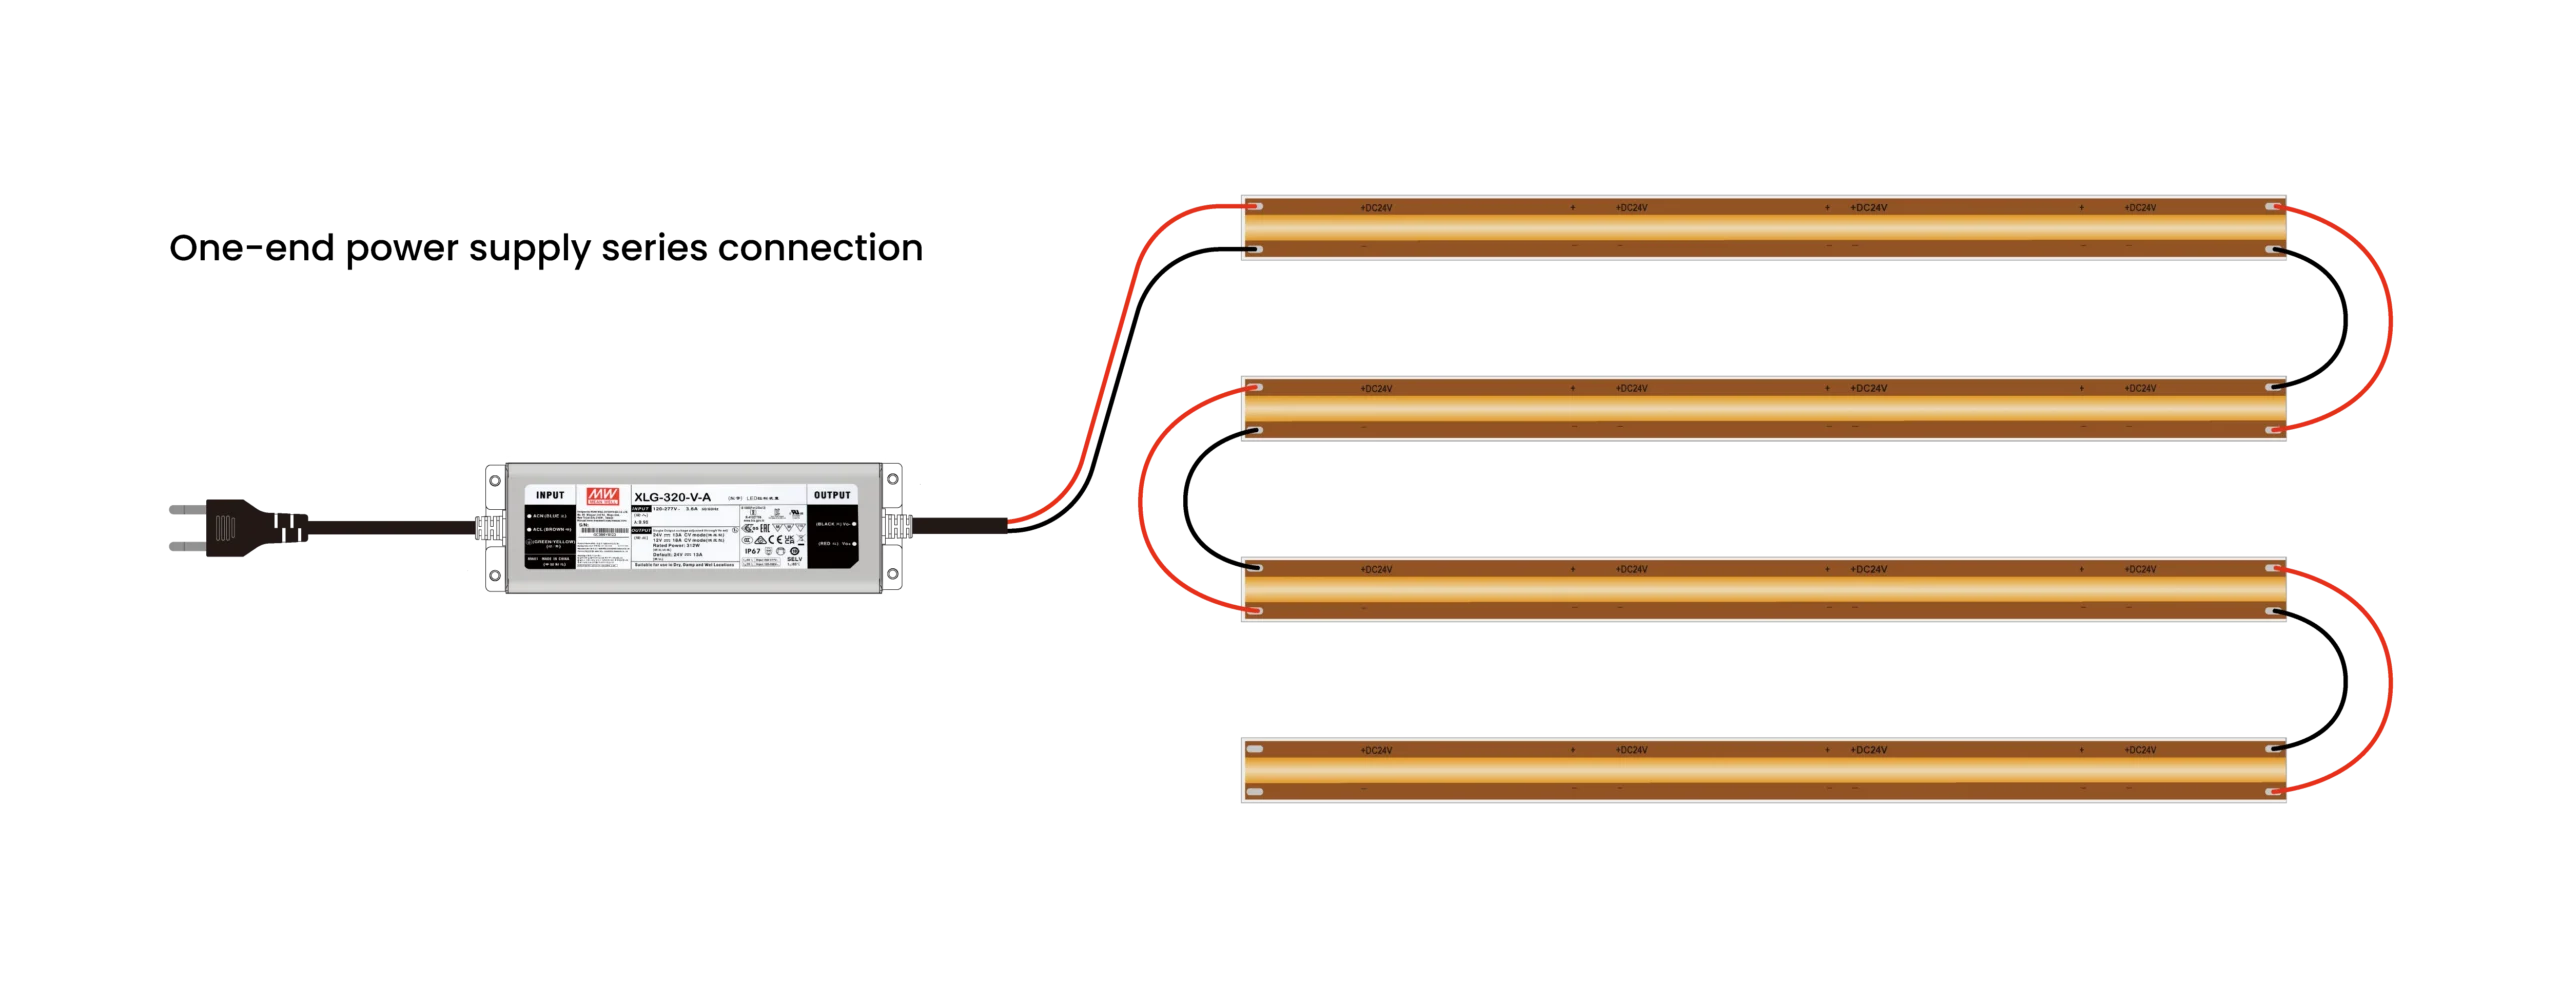
Why it’s poor:
- Voltage drop accumulates along the chain; the last section is the dimmest.
- Problems become obvious when you exceed the 5 m (12 V) / 10 m (24 V) guideline.
Use only when:
Total length is ≤ 5 m (12 V) or ≤ 10 m (24 V) and end-of-run brightness isn’t critical.
B) Parallel feed (most recommended)
What it is: Each strip (or segment) connects directly to the power supply outputs (often via a splitter or branch wiring). Every strip “sees” nearly the same voltage.
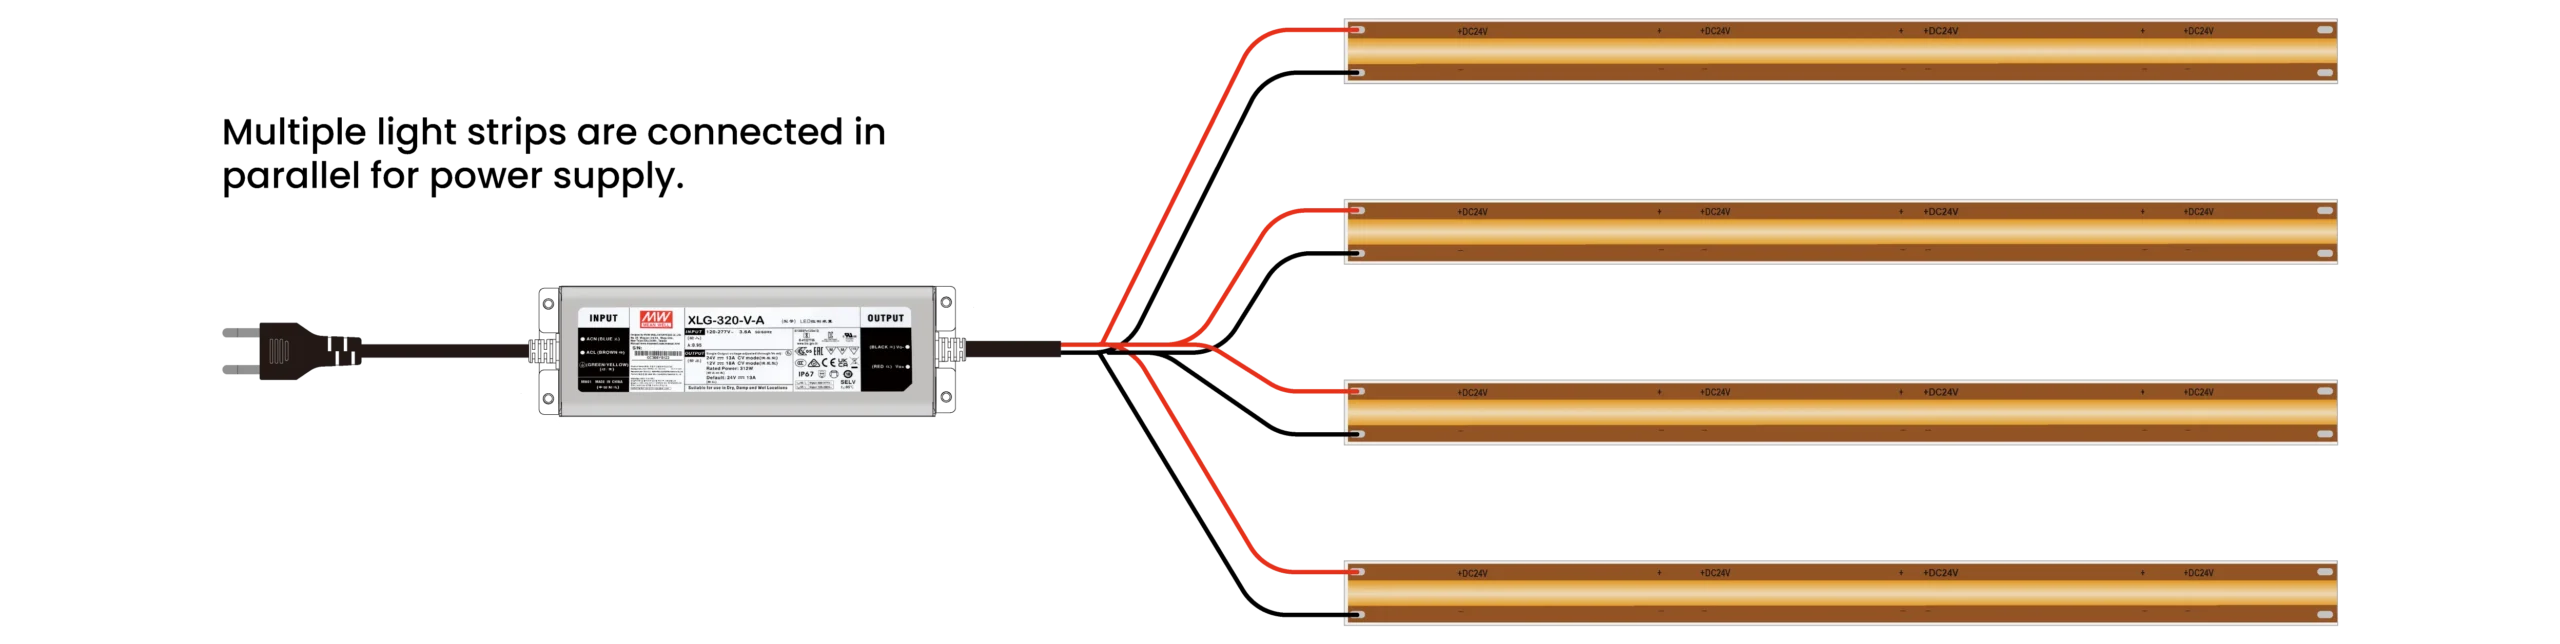

Why it’s great:
- Minimal voltage drop per segment; Uniform brightness (>90% consistency) best uniformity.
- Single strip failure isolation,A failure on one segment doesn’t take down the others.
Key notes:
- Each parallel segment still obeysthe single-run rule (5 m/10 m).
- Your power supply must cover the total load(see Section 5).
Use when:
- Multiple shorter segments spread around (different walls, cabinet levels, zones).
C) Two-end feed (best for a single long run)
What it is: Connect the power supply to both the head and the tail of the same strip (same big power supply or 2 different power supply, same +/– at both ends). Current flows from both ends toward the middle.

Why it helps:
- Cuts the current traveling across the strip length, reducing voltage drop dramatically.
- Extends the length that remains evenly lit (e.g., 12 V can often reach ~8–10 m, 24 V can often reach ~15–20 m, depending on strip specs).
Safety note:
- Properly done with the same big power supply(or 2 differnnt small power supply), two-end feed does not short-circuit. The internal parallel structure of strips allows current to balance from both ends.
Check the links:https://www.youtube.com/watch?v=MNxRiYyKCKg
Use when:
- You need one continuous strip close to or slightly beyond the guideline (long bar counter, corridor coves, long linear slots) and can’t split into separate parallel segments.
Execution tips:
- Use adequately thick, short supply leads (e.g., 18 AWG or thicker for longer feeds).
- Ensure both ends are connected to the same + – outputs.
5. Power supply sizing—simple and reliable
PSU =(L total×P W/m )×1.2
Use a 1.2 safety factor (≈20% headroom).
Example
10 m strip at 10 W/m → load = 100 W → choose ≥ 120 W PSU.
Why headroom matters
- Real-world efficiency and wiring losses,
- Lower heat and longer PSU lifespan,
- Room for transient peaks and dimming control overhead.
PSU tips
- Match voltage: 12 V strip ↔ 12 V PSU, 24 V strip ↔ 24 V PSU,
- Prefer reputable brands with CE/UL certifications,
- Choose constant-voltage (CV) supplies,
- Consider environment (indoor/outdoor, IP rating), size, and cooling.
Many wiring diagrams say “Total strip wattage ≤ transformer wattage.” That’s the bare minimum. For stability and longevity, we strongly recommend the +20% headroom rule above.
Other tips 1:
If you have a sufficient budget(2-3 times expensive than normaly CV strips) and it is for people whom inconvenient to supply power from both ends.
we recommend choosing a constant voltage& constant current light strip.
- CC&CV24V Max running length<30M,
- CC&CV48V Max running length<50M.
Other tips 2:
High voltage(110V&220V) strips, Maximum could run can illuminate up to 100 meters. But unsafe and do not offer many color change modes, so they are not recommended.
6. Scenario-based recommendations
Scenario | Recommended wiring | Why |
≤ 5 m (12 V) or ≤ 10 m (24 V) | Single-end feed or parallel | Most economical; short enough that drop is limited |
> 5 m (12 V) or > 10 m (24 V) | Parallel | Best brightness uniformity; easy to expand |
Single long run near the limit | Two-end feed | Raises tail voltage; improves uniformity |
Very long installations (far beyond 10–20 m) | Segment + distributed PSUs | Local power reduces drop and simplifies maintenance |
7. Common mistakes (and how to avoid them)
Mistake 1: Daisy-chaining long lengths (> 5 m @12 V, > 10 m @24 V) → dim tail.
Fix: Respect run limits or switch to parallel/two-end feed.
Mistake 2: Power supply sized “exactly equal” to load → hot PSU, early failure.
Fix: Add ≥ 20% headroom.
Mistake 3: Tail feed wires too thin/too long → the wires themselves drop voltage.
Fix: Use thicker gauge (e.g., 18 AWG or thicker) and keep leads short.
Mistake 4: Confusing V and W → wrong selection.
Fix: Double-check spec sheets: voltage is V (12 V / 24 V).
Mistake 5: Afraid two-end feed will short → avoid using it.
Fix: With the same/different PSU and correct polarity, it’s safe and effective.
8. Wrap-up
1.) Voltage drop is the main reason for end-of-run dimming on low-voltage strips.
2.) Follow the golden rule: 5 m @12 V, 10 m @24 V per single run.
3.) Prefer parallel wiring for multi-segment jobs; use two-end feed for a single long run; avoid long daisy-chains.
4.) Size the PSU with ≥ 20% headroom: PSU ≥ length × W/m × 1.2.
As a strip manufacturer, we can support your project with:
1) Accurate PSU sizing and wiring design,
2) High-quality low-voltage strips with clearly labeled specs (voltage, W/m, A/m),
3) Compatible power supplies and accessories.
Have a plan or a sketch? Send it over—we’ll review and propose a clean wiring layout with the right PSU.
[Manufacturer’s Value-Add Services]
For readers:
✅ Free Wiring Design (CAD-ready drawings)
✅ PSU Calculator Tool (Excel download)
✅ Dual-Feed Waterproof Connectors (Limited offer)
>> Contact our Global Tech Team for 《Low-Voltage LED Strip Engineering Guide》
Author

Andy Gao
With 15 years in the LED lighting industry, I’ve witnessed its evolution from general fixture production to today’s highly specialized segments. As Co-Founder of Veldstar, my journey mirrors this shift – driving our exclusive focus on pergola and garden lighting solutions. Through dedicated innovation, we develop controllers and systems rivaling leaders like Somfy and Teleco. Here, I share insights and showcase products engineered to elevate outdoor spaces with style, functionality, and advanced control. Learn more via linkendin profile:https://www.linkedin.com/in/pergolalights/

Pingback: How to Wire LED Strip Lights: A Comprehensive Guide with Wiring Diagrams - pergolalights.net
Pingback: The Ultimate Guide to LED Color Temperature (2000K-6500K)