

LED strip lights have become a popular choice for both indoor and outdoor lighting and decoration due to their flexibility, energy efficiency, and long lifespan. Whether for accent lighting, under-cabinet lighting, or creating a mood in your home, LED strips can deliver stunning results. However, to unlock their full potential, correct wiring is essential.
This article will serve as your ultimate guide, providing a comprehensive, step-by-step tutorial on how to wire LED strip lights. We’ll delve into the methods for wiring everything from the simplest single color LED strips to more complex Dual CCT, RGB, RGBW, RGBCCT and Addressable types. We’ve also integrated the most practical tips and troubleshooting solutions to ensure you can complete every installation safely and perfectly. Through this guide, you will master various LED strip light wiring diagrams and learn how to perform a proper LED strip connection.
Before you pick up your tools, understanding a few key concepts will help you avoid common wiring mistakes and make your project a success.
1. Voltage Drop
Voltage drop is a common phenomenon in low voltage LED lighting systems. As current flows through the wires, it loses some voltage due to the wire’s resistance. The result is that the end of a long LED strip will appear dimmer than the beginning. The longer the strip, the more noticeable this difference.
To better understand voltage drop, you can watch this short video, which will visually demonstrate the effect to you:
How to Solve It?
- Dual-End Powering: For longer strips, connecting power to both ends can effectively reduce voltage drop.
- Power Injection: For very long runs, inject power every 5 meters to maintain consistent brightness.
- Use Thicker Wires: Thicker wires have less resistance and can effectively reduce voltage loss.
If you want to learn more in detail about LED strip voltage drop‘s causes and solutions, you can read the reference article at the end of this post.
2. Series vs. Parallel Connection
The correct way to wire multiple LED strips is in parallel, not in series.
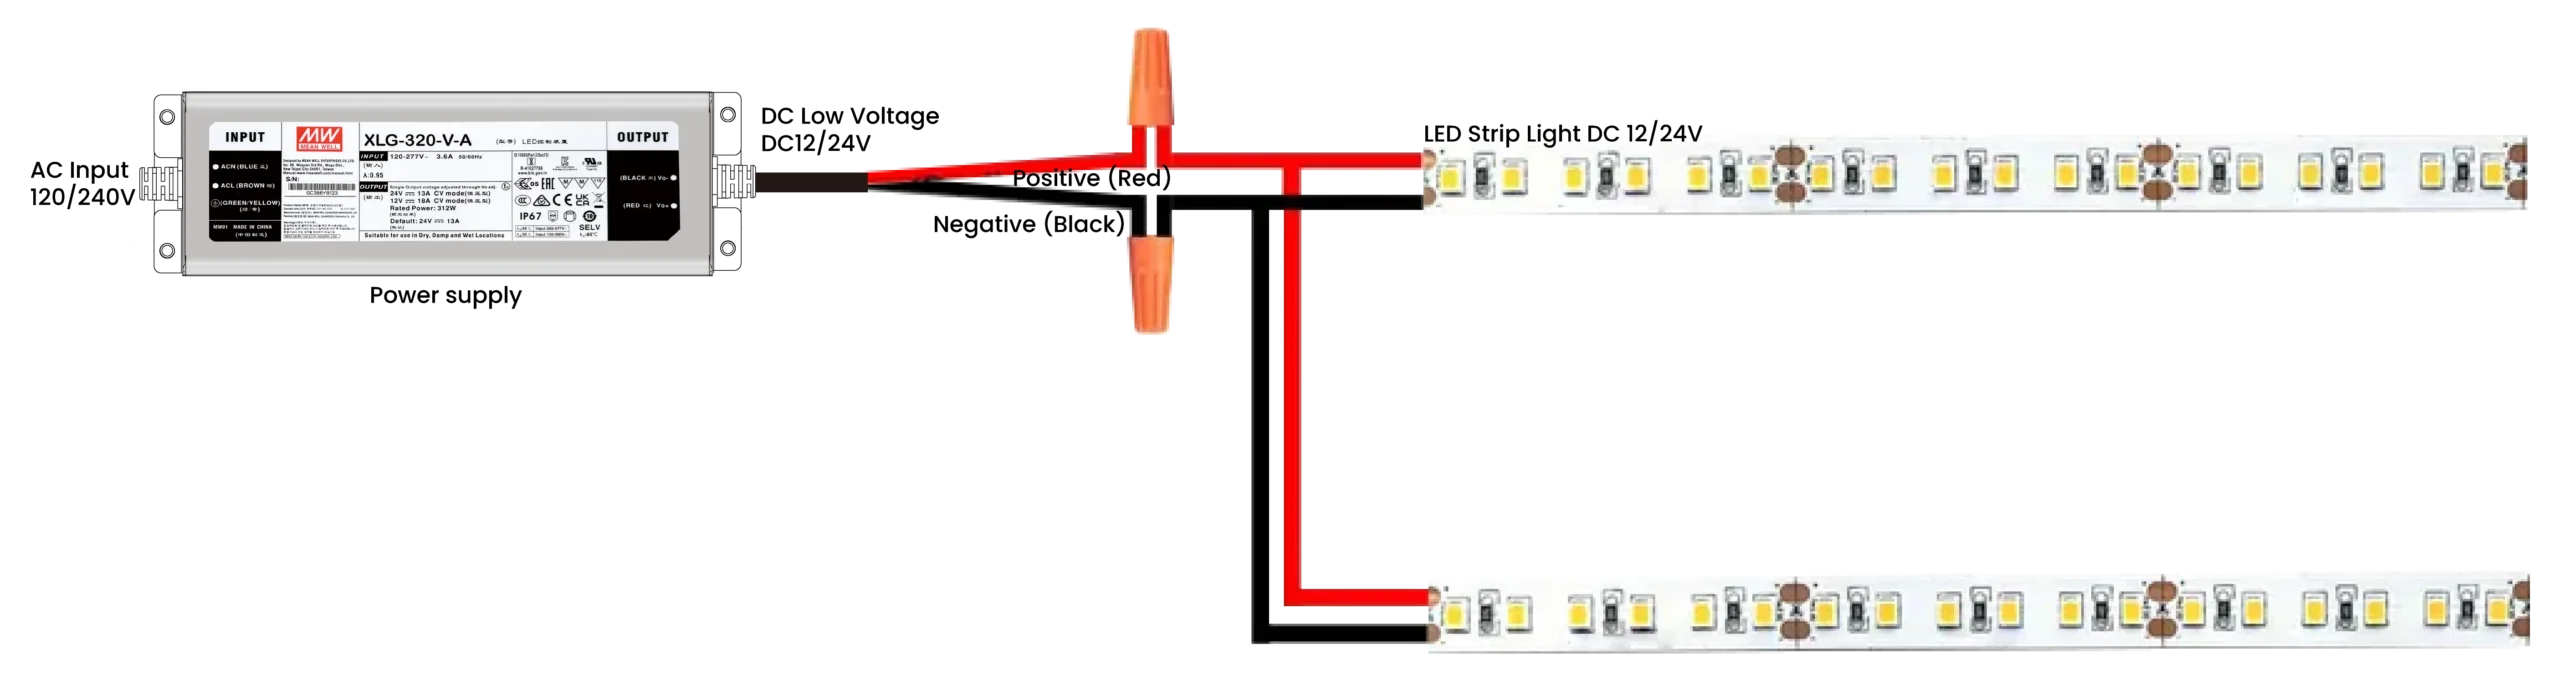
- Parallel Connection: Connect the positive leads of all strips to the positive terminal of the power supply, and all negative leads to the negative terminal. This ensures each strip receives a stable voltage and maintains uniform brightness.
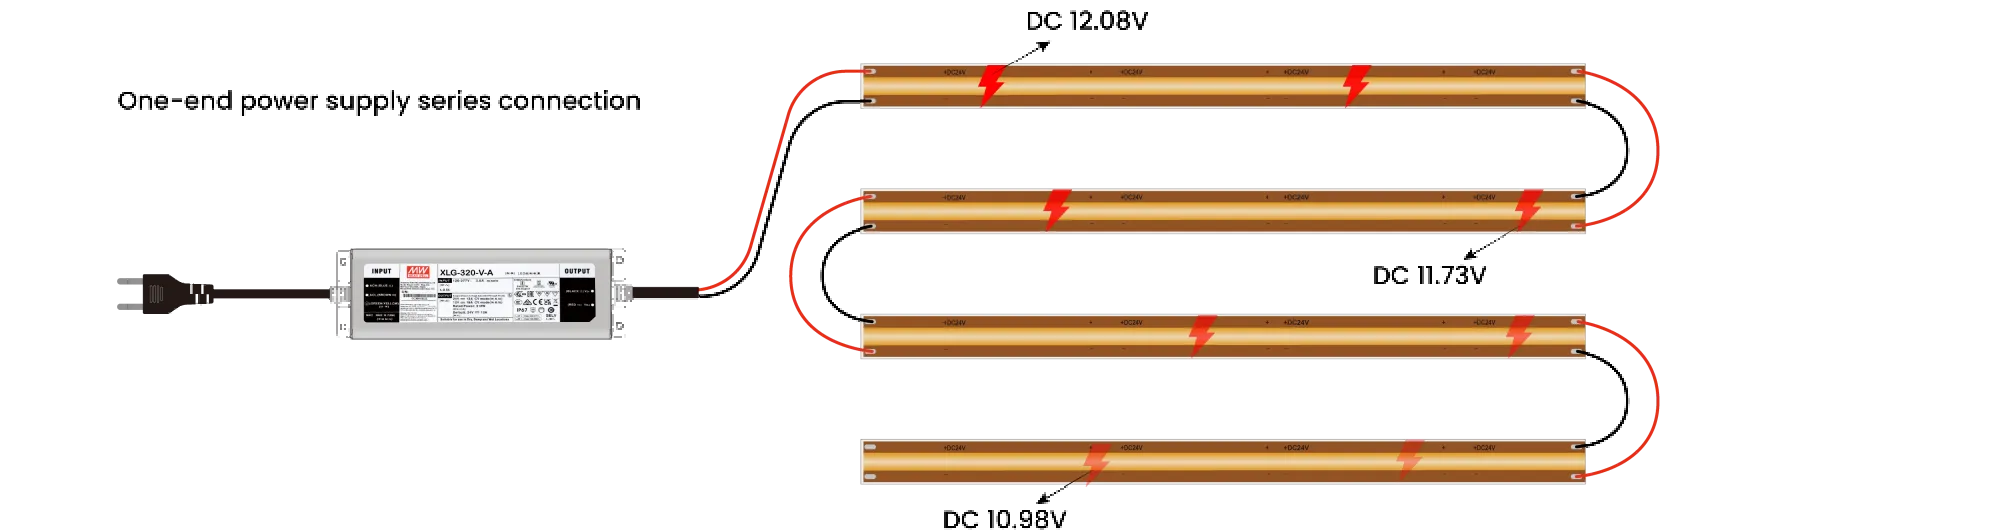
- Series Connection: Connecting the end of one strip to the beginning of the next. This causes a drastic voltage drop, making the strips at the end of the chain very dim or even unlit.
3. LED Amplifier
When the total power consumption of your LED strips exceeds the capacity of your controller, you should use an LED amplifier. This device amplifies the signal from the controller, allowing you to run multiple high-power strips with a single controller without affecting their brightness or performance.
Here, we will introduce the most common types of LED strips one by one, providing clear wiring diagrams and step-by-step tutorials.
Single Color LED Strip (2 Wire)
This is the simplest type, typically with two wires: one positive (+) and one negative (-).
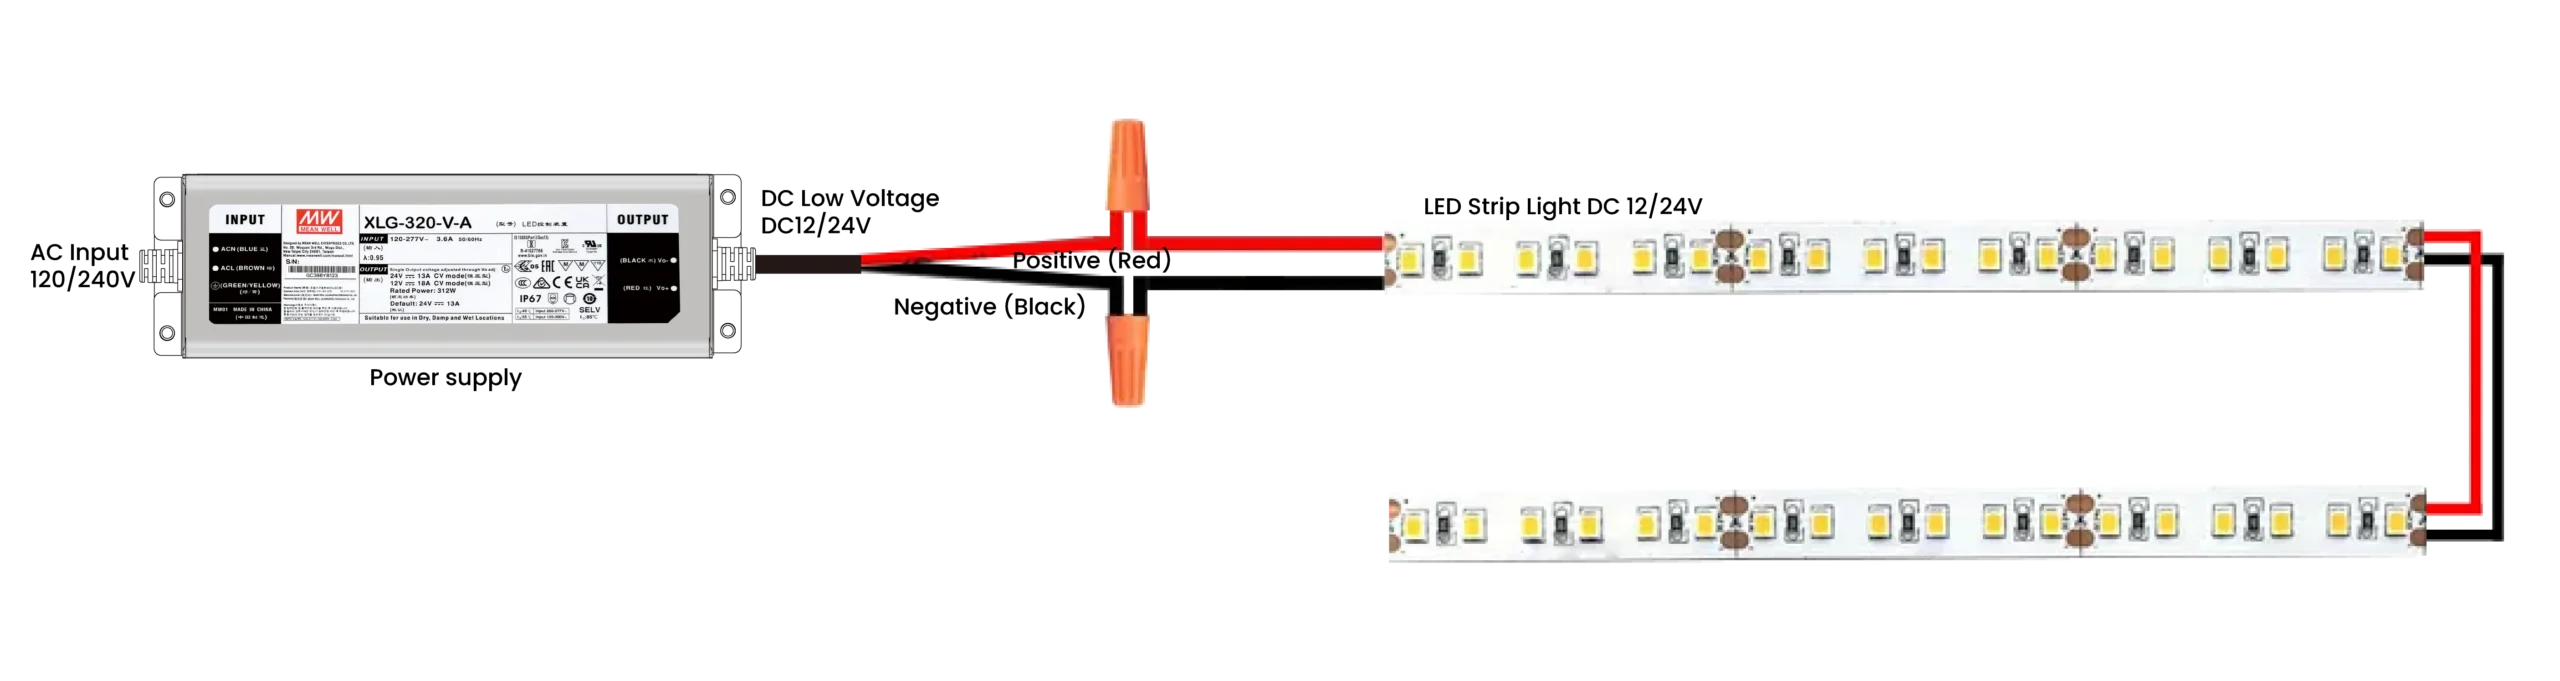
- Wiring Diagram: Power supply positive → Strip positive; Power supply negative → Strip negative.
- Step-by-step tutorial:
- Check the voltage of your strip and power supply (usually 12V or 24V).
- Connect the power supply’s positive wire(usually red) to the strip’s positive terminal.
- Connect the power supply’s negative wire(usually black or white) to the strip’s negative terminal.
For a better understanding, here is a detailed 2-wire led light wiring diagram.

RGB LED Strip (4 Wire)
RGB strips mix Red (R), Green (G), and Blue (B) to create a wide range of colors. They typically have four wires: a common positive (V+) and three negative wires for each color (R, G, B).
To help you master this, we’ll walk you through the proper RGB LED strip wiring diagram and a step-by-step tutorial.
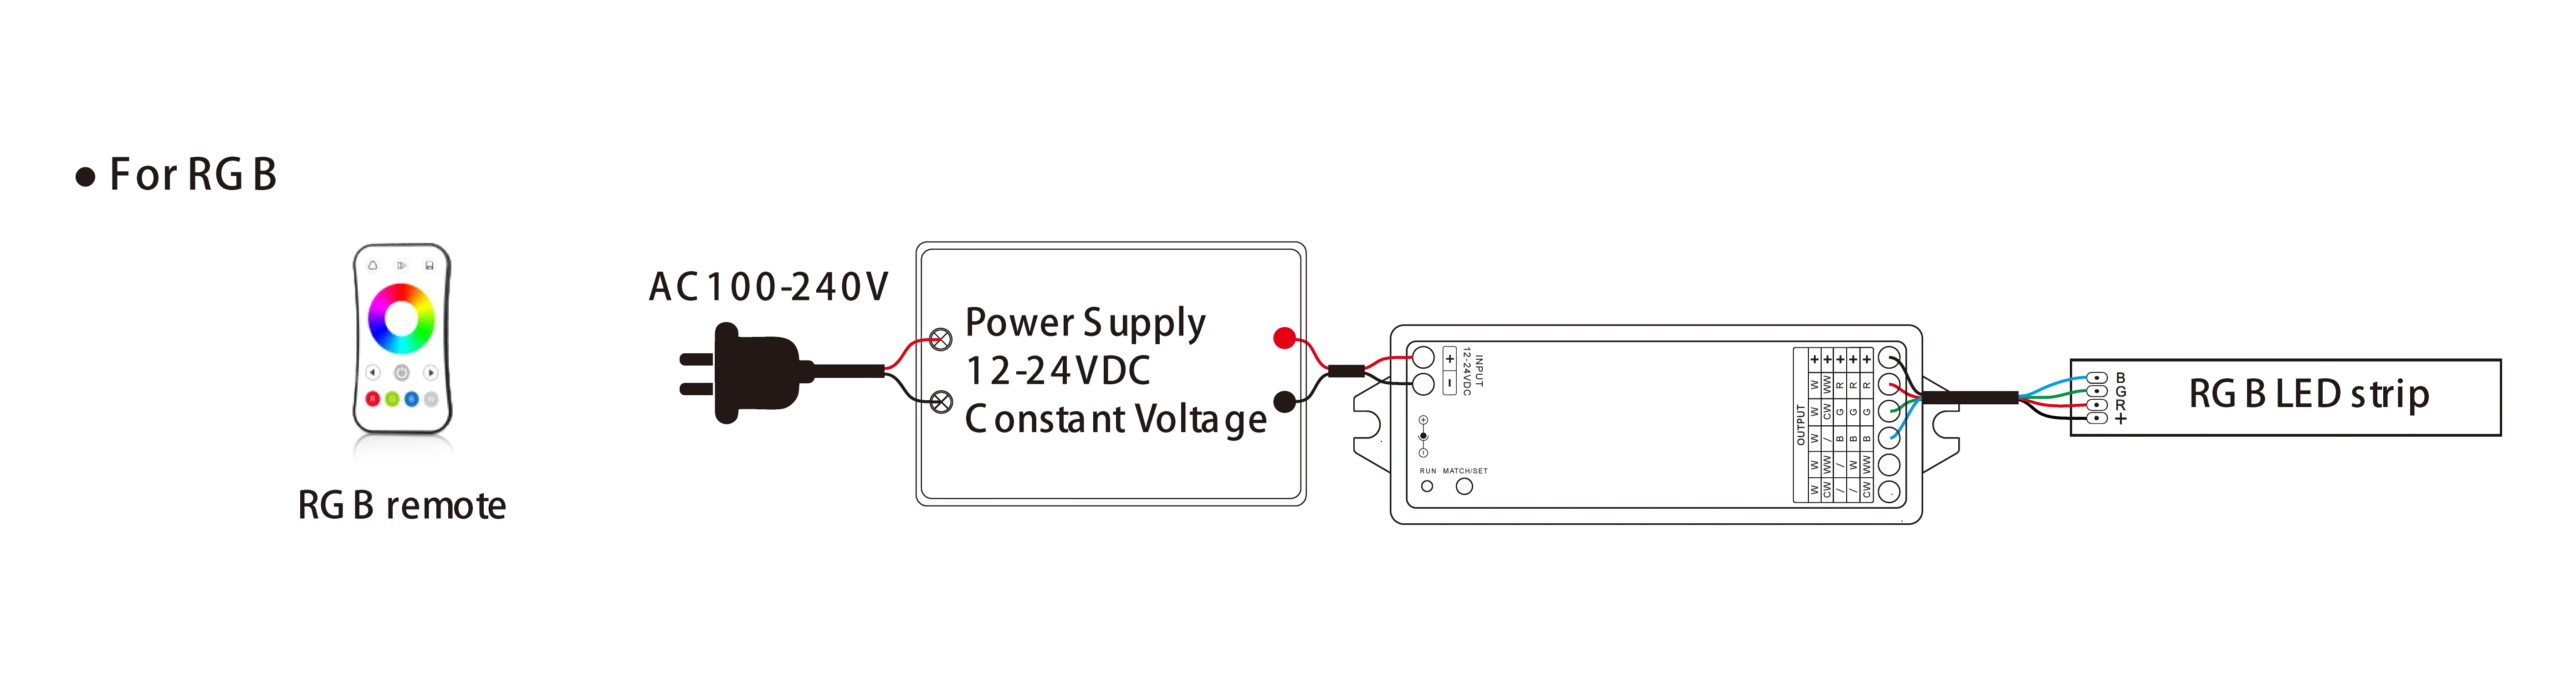
- Wiring Diagram: Power supply → RGB controller→ Strip.
- Step-by-step tutorial:
- Connect the power supply’s positive and negative wires to the corresponding ports on the RGB controller.
- Connect the strip’s V+ wire to the V+ port on the controller.
- Connect the strip’s R, G, and B wires to the corresponding R, G, and B ports on the controller.
Want to know how to connect RGB LED strip with controller? Just follow the 4 pin led strip wiring diagram below.
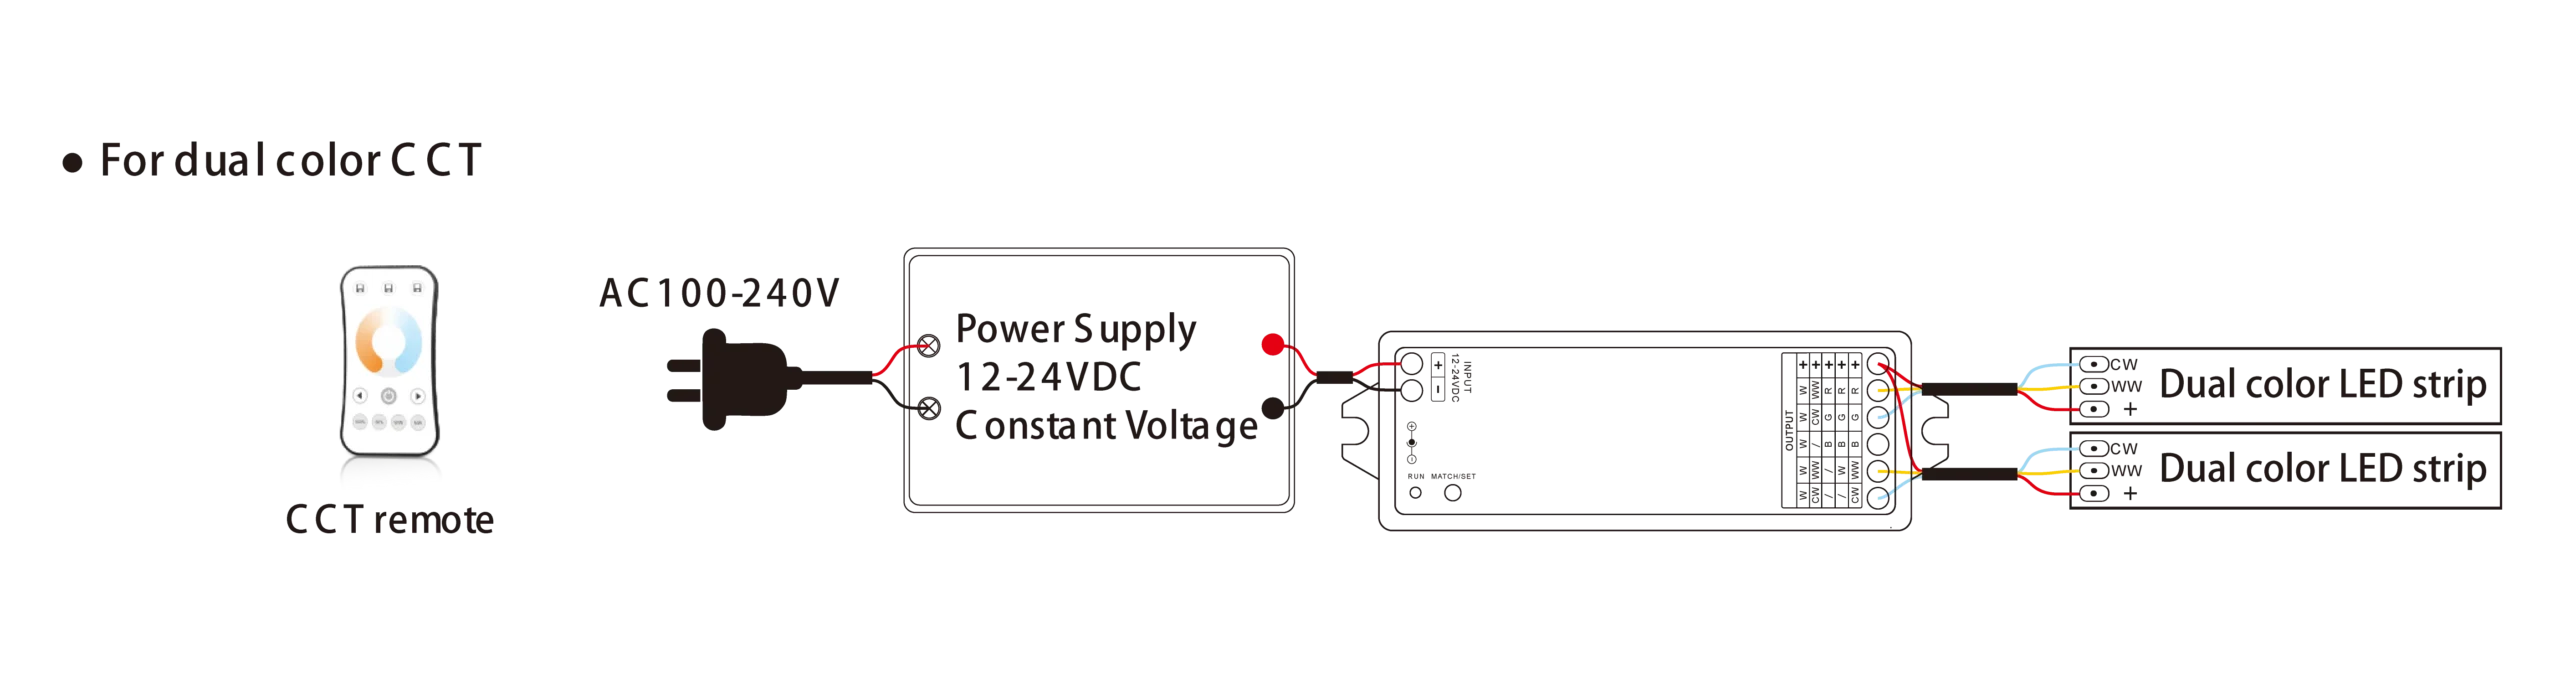
Tunable White LED Strip (3 Wire)
This strip allows you to adjust the color temperature from warm to cool white. It has three wires: a positive (+), a warm white negative (-WW), and a cool white negative (-CW).
- Wiring Diagram: Power supply → Tunable White controller → Strip.
- Step-by-step tutorial:
- Choose a dedicated tunable white controller.
- Connect the strip’s +, -WW, and -CW wires to the corresponding ports on the controller.
This is a typical 3 wire led light wiring diagram.
RGBW LED Strip (5 Wire)
An RGBW strip adds a dedicated white light chip to the standard RGB, providing a purer white light. It has five wires: V+, R, G, B, and a white (W) negative.
- Wiring Diagram: Power supply → RGBW controller→ Strip.
- Step-by-step tutorial:
- Choose a dedicated RGBW controller.
- Match and connect the strip’s five wires to the corresponding ports on the controller.
This is the standard configuration for a 5 wire led strip wiring diagram.

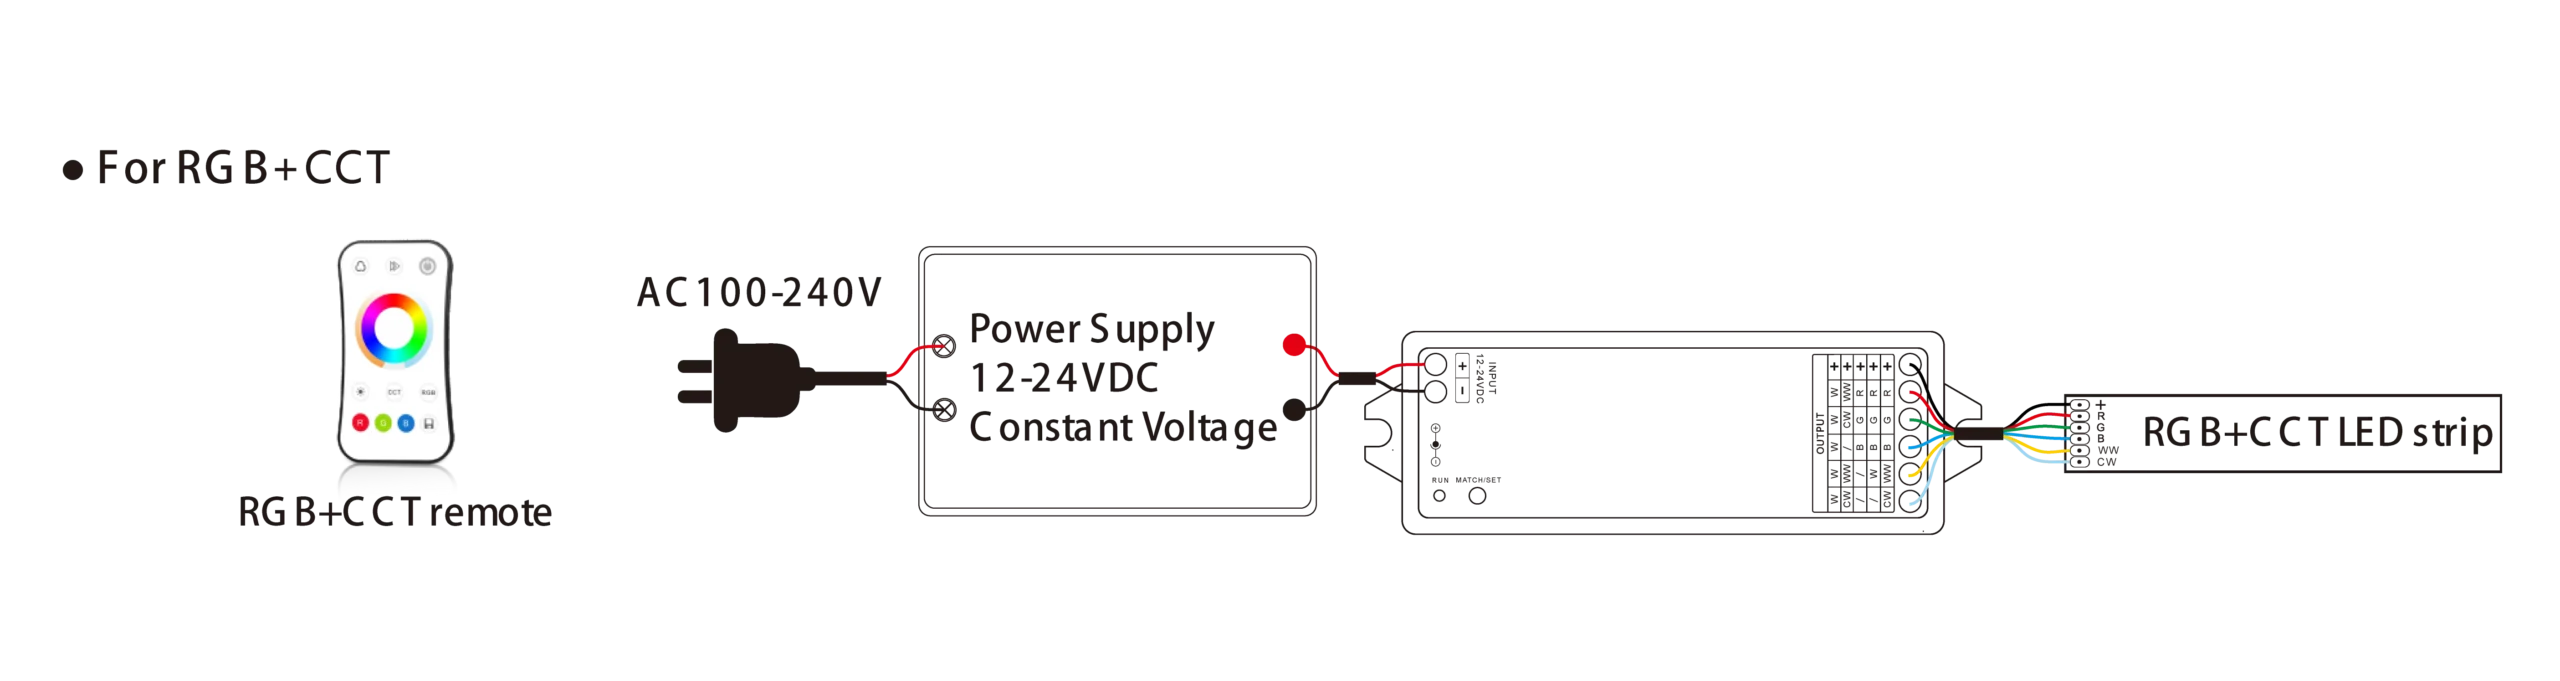
RGB+CCT LED Strip (6 Wire)
The RGBCCT strip is one of the most versatile types, combining both RGB color and CCT (Color Correlated Temperature) functionality. It typically has six wires: V+, R, G, B, cool white (CW), and warm white (WW).
- Wiring Diagram: Power supply → RGBCCT controller→ Strip.
- Step-by-step tutorial:
- Select a dedicated RGBCCT controller.
- Match and connect the strip’s six wires to the corresponding ports on the controller.
Addressable LED Strip
This type of strip allows each LED to be controlled independently, enabling complex effects like chasing and flowing light. It typically has three wires: power positive (V+), ground (GND), and a data line (Data).
- Wiring Diagram: Power supply → Addressable controller→ Strip.
- Step-by-step tutorial:
- Connect the controller to the power supply.
- Connect the strip’s V+, GND, and Data wires to the corresponding ports on the controller.
1. How to Connect Multiple LED Strip Lights?
This is a very common requirement. The correct method is to use a parallel connection, not a series one. If you want to connect multiple strips, the most important thing is to ensure that each strip gets power directly from the power supply or controller, rather than daisy-chaining them end-to-end.
Why Not Series?
LED strips are low-voltage products, and each segment produces a small voltage drop. If you connect multiple strips in series, the voltage drop accumulates, causing the farthest strips to become noticeably dimmer or even unlit due to insufficient voltage.
Correct Methods: Parallel or Power Injection
- Parallel Connection: Connect the positive wire(V+) of all LED strips to the positive terminal of the power supply/controller, and connect all negative wires (R, G, B, W, etc.) to the corresponding negative terminals. This ensures that each strip receives a stable and sufficient voltage.
- Power Injection: For a long single strip (e.g., over 5 meters), you can connect power wires to both ends of the strip, or even to a point in the middle. This acts like having multiple fueling stations for a long road, effectively counteracting voltage drop and maintaining consistent brightness throughout the run.
If you are searching for how to connect 2 led light strips together, the correct approach is to wire them in parallel to the same power supply.
2. How to Calculate the Required Power Supply Wattage?
An underpowered power supply is the most common cause of flickering or unstable brightness. To ensure a stable system, you need to choose a power supply with sufficient wattage redundancy.
Calculation Formula: Required Power = (Strip wattage per meter × Total length) × 1.2
- Strip wattage per meter: This parameter can be found on your LED strip’s packaging or specification sheet (e.g., 14.4W/m or 7.2W/m).
- Total length: The total length in meters of the LED strips you plan to install.
- 2 (Redundancy Factor): This is a critical safety factor, meaning you need at least 20% of power redundancy. This prevents the power supply from operating at high loads for extended periods, extending its lifespan and ensuring there is enough instantaneous power for startup or color changes.
For example, if you have 10 meters of a 7.2W/m single-color strip, you need: 7.2 W/m × 10 m × 1.2 = 86.4W. Therefore, you should choose a power supply rated above 86.4W, such as a 100W or 120W model.
3. What If My RGB Strip Has the Wrong Color, or One Color Is Out?
This is typically caused by incorrect wiring or a loose connection. Before assuming a controller or power supply failure, you can perform the following checks:
- Check All Connections: Carefully inspect the R, G, Bsignal wires and the V+ power wire between the RGB controller and the strip. Make sure all wires are securely inserted into their corresponding ports, with no looseness or disconnection.
- Color Matching: Confirm that the R, G, and Bwires on the strip correspond one-to-one with the R, G, and B ports on the controller. Sometimes users may plug the R wire into the G port, which will cause color confusion.
- Inspect Strip Segments: If only one section of the strip has the wrong color or is unlit, the PCB or a solder joint on that segment may be damaged. You can try to reconnect at a cut point or replace the damaged strip section.
- Reset the Controller: Sometimes, a controller can experience a signal glitch. Try disconnecting the power for a few minutes and then reconnecting it. This can often resolve temporary software issues.
Q: Can I cut LED strip lights?
A: Yes, you can. Most LED strips have cut marks (marked with a scissor symbol or copper pads). You can cut at these points, and the cut-off section can be reused by re-soldering new connecting wires.
Q: Why is my LED strip light hot to the touch?
A: LED strips generate heat during operation. As long as the temperature is within a normal range (usually below 50℃), it’s fine. If it’s excessively hot, it could be due to poor heat dissipation or an overpowered system.
Q: How do I tell the difference between the positive and negative terminals?
A: Typically, the strip will have markings like “V+” or “+” for positive and “GND” or “-” for negative.
Q: What tools do I need to wire LED strips?
A: You’ll typically need wire strippers, scissors, a screwdriver, electrical tape, and if you plan to solder, a soldering iron and solder.
Q: What are “2 wire”, “3 wire”, “4 wire”, “5 wire”, and “6 wire” strips?
A: These numbers refer to the number of output wires on the strip. 2 wire is for single-color, 3 wire for tunable white, 4 wire for RGB, 5 wire for RGBW, and 6 wire is for RGBCCT.
Q: Why is only half of my LED strip lit up?
A: This is usually caused by voltage drop. When a strip is too long, voltage gradually dissipates, causing the end of the strip to dim. The solution is to use a parallel connection or power the strip from both ends.
Q: Why are my LED lights flickering or blinking?
A: This is often due to an underpowered power supply. You should recalculate the total wattage of your strips and ensure your power supply has a 10-20% wattage buffer.
Q: Can LED strips be bent?
A: Yes, LED strips are flexible, but you should avoid bending them beyond their minimum bending radius to prevent damaging the internal circuits.
Congratulations! By reading this guide, you’ve mastered the basic principles and specific methods for wiring common LED strips. You are now equipped to complete your installation safely and efficiently, just like a professional. If you encounter any challenges or need more professional products, our expert team, with over 15 years of industry experience, is always ready to assist you.
References
Author

Andy Gao
With 15 years in the LED lighting industry, I’ve witnessed its evolution from general fixture production to today’s highly specialized segments. As Co-Founder of Veldstar, my journey mirrors this shift – driving our exclusive focus on pergola and garden lighting solutions. Through dedicated innovation, we develop controllers and systems rivaling leaders like Somfy and Teleco. Here, I share insights and showcase products engineered to elevate outdoor spaces with style, functionality, and advanced control. Learn more via linkendin profile:https://www.linkedin.com/in/pergolalights/

Share This Article:
Send Us your Request